What "color mode" should be files be?
Lorem ipsum dolor sit amet, consectetur adipisicing elit, sed do eiusmod tempor incididunt ut labore et dolore magna aliqua. Ut enim ad minim veniam, quis nostrud exercitation ullamco laboris nisi ut aliquip ex ea commodo consequat. Duis aute irure dolor in reprehenderit in voluptate velit esse cillum dolore eu fugiat nulla pariatur.For best outcomes, we recommend receiving your files in a CMYK color mode.If you send us an RGB file, there is a chance that a “color” shift may occur and you may not be satisfied with your job.

RGB is the color code for color on screens

CMYK is the color mode for printers
What "print resolution" should I use?
Best final results are at 300dpi (dots per inch).However, paper finish is your best final decision maker. Why? Because gloss paper (coated paper stock) and an image at 300dpi helps the colors to be richer or vibrant depending on image style selection. Non-gloss paper (uncoated paper stock) at 300 dpi may become muddy looking as the paper finish is softer and more porous – this creates a bleeding effect on the paper. Backing down the dpi to 200 may be the best solution which opens up the dot area and creates a clean and tactile image presentation.

Recommended “print resolution” for gloss or coated paper stocks.

For non-gloss or uncoated papers, 200dpi can create beautiful images.
How should I set up the "bleed"?
For best visual display, “bleeds” must extend beyond the cut-line and will be trimmed away from the printed product during the final cutting phase. It is important that your designed piece has all visual elements, whether borders, color bars or imagery extend beyond the intended final size of the designed piece. Bleeds can be a part of the printing and final production process that nicely finishes the look and quality of the final product. Bleed sizes can vary per project and item, but is typically 1/8”.

Desired trimmed, finished size and area “Live Area”.
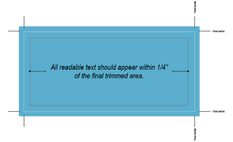
The extended area shown here beyond the “trim marks” is considered “the bleed.”
What vertical/horizontal "set up format" should I use?
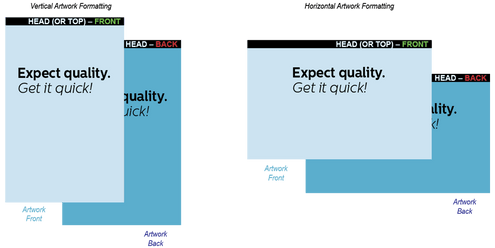
Your best practice, for proper and no surprise results is to first consider your “set up format” layout. Once we review your artwork, next steps for “prepress” involve aligning the top of the front to the top of the back of the piece (if two sided), the industry classifies this as “head-to-head”. Carefully review your “outcome intent” so you don’t end up with a final piece that looks upside down when you turn it over.
How do I avoid a logo showing a white background?" lack of transparency"?
This is a file set up structure issue. If your file has been set up as a jpg (jpeg), it typically appears with a bounding white box or background. Converting your file to a png, eps or psd with zero background declared or “transparency” will generate the intended outcome and presentation of the subject matter. This resolution may require that you have the Adobe Illustrator or Adobe Photoshop.

Should I send a sample file or proof?
No, as this may create order confusion for our internal departments. Please send only the file in the requested format that you want printed. Multiple “sample documents” may seem like a good idea, however keeping your communication and artwork more singular is a smart choice when ordering print services. Simply, do not send files you do not want printed.

What is an "overprint" and what does it mean for my printed piece?
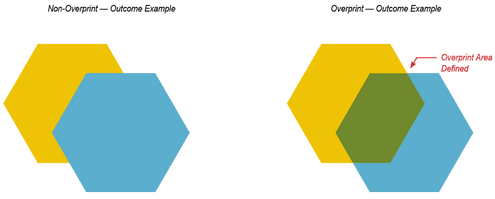
“Overprint” is a technical print production term. Another way to think about this would be “overlap” of color fields or images. Depending on your desired effect, not overprinting, which is a prepress production protocol at 760Print produces delivers full color or image presentation as sited below. Choosing to “overprint” would generate a pseudo third color or potentially muted or muddy result.
Should I submit a "two-sided artwork" on one page?
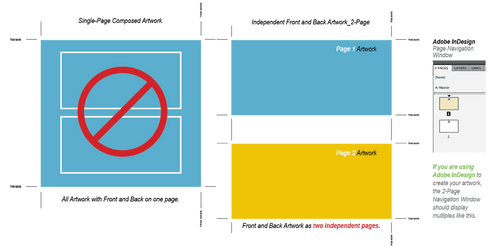
Best practices say “no.” When you set up your artwork it is best to create 1 unique page per side in your total document. Page 1 would represent the front or cover side and Page 2 would represent the backside of the artwork etc.“Two-sided artwork” is the best solution for minimal problems.
How can I make a "true blue" and not have it look purple?
Blue can be a challenge to keep pure but follow this simple guide. Depending on the “true blue” your looking for (there are many), choose your desired blue color value, then monitor the amount of magenta (red) that blends together that for blue you are looking for. Note below how a small 20% reduction of Cyan creates a large color shift.

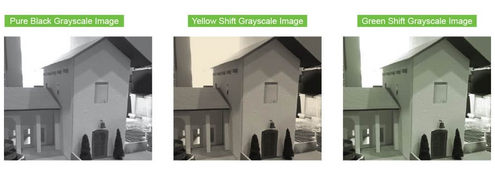
How do I get a "greyscale image" from a CMYK document?
The correct first step would be to convert your CMYK image to a “grayscale image” within Adobe Photoshop. Be aware that print files may shift their tonal values to show your final image with a yellow or green cast.grayscale exampleBegin by evaluating the CMYK values of your grayscale file in the final CMYK document. If there are other values other than K (black) in your grayscale image, there is a chance that the color may shift or vary.To eliminate all values other than K, use your Channel Mixer (adjustment layer) in Photoshop, then click “Monochrome” adjusting accordingly.
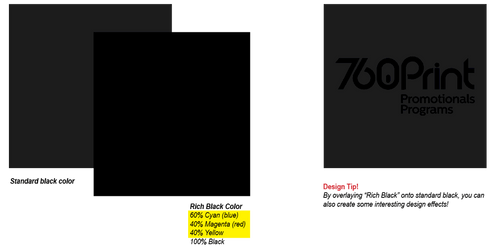
What is "rich black" and how can I achieve it?
“Rich black” is a color build that generates a more pleasing print outcome by utilizing a CMY inks as a supplement to K (black). Creating a richer as outlined below will strengthen your final artwork output presentation.
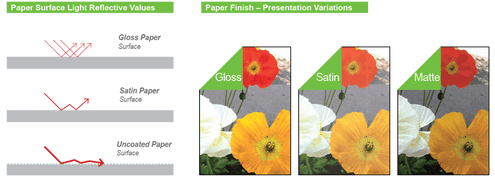
What does "calendaring" refer to for paper?
“Calendaring” refers to the finished surface of the paper. Simply, gloss paper is shiny because the surface of the sheet has been calendared or polished to create this final appearance. Matte and Satin paper finishes are at a mid point of lustre while dull or uncoated are more porous. All finishes having redeeming design value, but require adequate communication during the offset printing process as dull paperstocks ‘absorb and spread’ ink potentially dulling or softening the image. other than K (black) in your grayscale image, there is a chance that the color may shift or vary.To eliminate all values other than K, use your Channel Mixer (adjustment layer) in Photoshop, then click “Monochrome” adjusting accordingly.
How do I best set up my files for "booklet style" artwork?
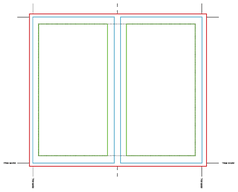
“Booklet style” production protocols vary by vendor and 760 Print prefers a single page set up like this:1) Page count always begins with one and should end with an even number (in sets of 4 pages)2) For a basic booklet style, note that page 2 is considered ‘the inside front cover’ with the balance as ‘running pages’ until the last two pages which are declared as ‘inside back cover’ and ‘back cover3) The artwork developed should also integrate .25” bleed beyond the trim and .5” safe area inside the page area4) Depending on design and type of booklet or magazine, crossovers are common and require extra attention. A crossover is an image, text or other graphic element that crosses-over from one page to another.Tip: numbering your pages will assist you with keeping the chronology straight as total page count goes up

Single Page Artwork Submission
Red = Bleed beyond page edge
Blue = Trim or final document size
Green = Safe area
Double Page Artwork Submission
Dotted Line = Possible image or color crossover from one page to another
How do I "export a .pdf" for the best printing outcome?
“Exporting a .PDF” is really simple. Follow the guidelines for InDesign below, it’s as easy as 1, 2, 3!
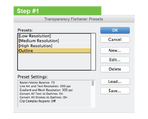
1) Begin here as this step will “create outlines” for all fonts within your document. At the top of your page go down to:Edit > Transparency Flattener Presets

2) Next go to the file menu at the top of your page and go down to:Adobe PDF Presets > [Press Quality]
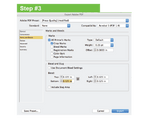
3) Lastly, once you’ve confirmed Step 2, the above window will automatically come up displaying your designated [Press Quality] (modfied) at the top.From the left, select:Marks and Bleeds > next select “Crop Marks” followed by > “Bleed” from the Bleed and Slug option below that.Within the first field insert 0.125 in, all other fields should auto populate.
I want "rounded corners" for my business cards, what radius do you have?
“Rounded corners” at 760 Print come in two cornering sizes, 1/8” and 1/4” radius.Rounded corner exampleTo create Rounded Corners within InDesign, you can access this option under the following pull down menu:Object > Corner Options

What is "banding" and what does it mean for me?
“Banding” can be caused by the program you are using that the file is exported from, such as Indesign. Note: gradient steps transitioning from a very light color to a dark color within in a small area may cause banding to occur.Banding exampleProduction Tip!To help prevent banding, check your digital files prior to sending. If you use a gradient, make sure it has enough length or distance across the design element for a smooth transition to occur.

How do I best set up my files for "booklet style" artwork? (continued)
The “Booklet style” production set up within InDesign appears under the pull down file menu. Your version or viewable option of this window within InDesign may appear differently.

Why would I want my "order bundled" prior to delivery?
“Order bundling” offers the great fulfillment convenience. Pre-sorting print orders into predetermined quantities help you, your customers and for EDDM (every door direct mail) purposes. Orders are typically bundled in quantities of either 50 or 100 pieces and will be banded in accordance with USPS EDDM banding requirements. If orders are for internal purposes only where you’ll pull “as needed” quantities, shrink-wrapping in specified quantities makes great sense. In either case, speak with a 760 Customer Service Representative first as extra time may be required for this process.
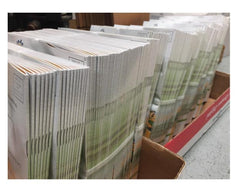
Banded EDDM Printed Product

Shrink Wrap Printed Product
What is the difference between a "perfect bound" and a "saddle stitch" book?
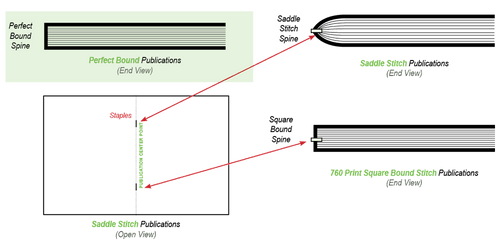
A “Perfect Bound” book or publication is held together by a single thermal glued edge on the binding side. Page count minimums apply so the paper-to-glue ratio holds the piece in total together. The end result is a clean and square binding edge. Note: Perfect Bound publications do not lay flat when opened.A “Saddle Stitch” book or publication is held together in the middle by typically two staples. As page volume goes up, 760 Print may recommend a cleaner presentation by going to Perfect Binding.760 Print also offers a unique “Square Bound Stitch” bindery solution for publications. For low volume runs, this option delivers the visual aesthetics of a perfect bound spine while utilizing a lower price point over perfect binding.
Can I mail "rounded corner postcards"?
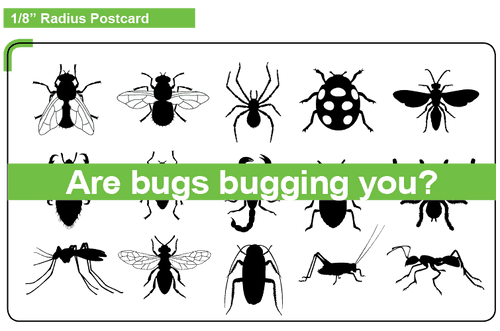
“Yes,” but there are U.S. Post Office restrictions and guidelines that apply. “Round corner postcards” are restricted to a radius of 1/8 inch (0.125”). See FAQ #14 as a guide for rounding corners in your artwork.Rounded postcard exampleFurther information may be found at: https://pe.usps.com/text/dmm300/201.htm#wp1042477
Can "digitally printed letterheads" be imprinted?
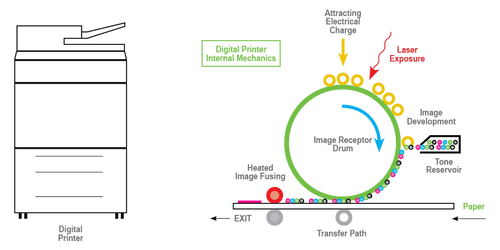
Our “Digitally printed letterheads” are printed on super high quality machines that utilize a heated toner sealing process. Usually imprinting ‘heat fused’ letterheads with ink jet style printers should be no problem, but laser printers use a heat sealing process where their temperatures vary from brand to brand (see laser printing process image below). The outcome may result in smudging or streaking on your letterhead as it makes its way through your laser printer, so laser printers are not recommended by 760 Print Promotionals & Programs please use only ink jet printers.
Can "offset printed letterheads" be imprinted on a laser or ink jet printer?
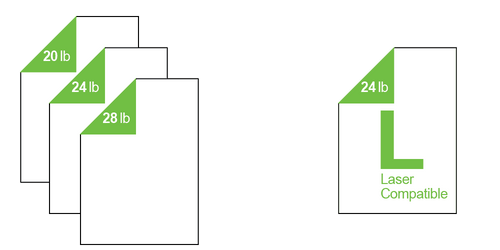
Yes, “Offset printed letterheads” from 760 Print Promotionals & Programs can be imprinted. Be certain your paperweight is 20#, 24# or 28# to ensure the best printer throughput though. Papers of heavier weight may jam your machine unless you specify card stock in your set up menu. We also recommend that “laser compatible” paper be specified when you order your initial print run of offset letterhead – this should generate the best job outcome when imprinting.
What type of file should I send for printing?
We recommend saving/exporting your file as a “.PDF”. Other acceptable alternate file types are: jpg, jpeg, tif, tiff, eps, and png.We prefer that you send .PDF with embedded or outlined fonts. PDF’s are easier to handle and will likely speed up your turnaround. Remember to flatten your files before uploading.

